Introduction
I have been using WordPress for a long time to host slashdevops.com blog site. I had been looking for a way to migrate this blog from WordPress to a static site generator and during the research I found Hugo and I can say I am very happy with it. Hugo allows me to write this blog posts in Markdown and it is very fast and easy to use.
I have also been using GitHub Pages for other of my personal jobs and I decided to migrate this blog GitHub Pages as well.
To perform this migration I used the following software:
- Hugo
- GitHub Pages
- GitHub Actions
- GitHub CLI
- Google Domains
- Disqus
- Fuse.js
- Hugo Theme -> PaperMod, Thanks to Aditya Telange for this theme 🙏.
My Experience
It took me some time to migrate this blog from WordPress to Hugo and GitHub Pages. I had to learn how to use Hugo, GitHub Pages and how to configure my slashdevops.com domain in Google Domains but it was worth it.
Now, the blog implement Disqus for comments and likes and it is very fast and responsive. Also, the blog implement fuzzy search using Fuse.js. I decided to lost the comments and likes from the WordPress posts, I’m very sorry about that.
👉 The most hard part was understand how should work the GitHub Pages and Hugo together.
There are several tutorials on the internet that can help you with this migration, but not even the official documentation of Hugo and GitHub Pages helped me to understand the fact that one of the best way is implementing two repositories to have this done - one repository to host the source code of the blog (the hugo repository, where you create the Markdown files) and another repository to host the compiled code of the blog (static files generated from hugo and in the public folder of the first repo).
Just to clarify, the source code repository is the one you use to write your blog posts and the compiled code repository is the one you use to host the blog.
Yes, truth, there are several ways to have this done, there are many blog posts and tutorials on the internet that can help you with this configuration of Github Pages and Hugo, the majority of these use two repositories approach with git submodules or override the docs folder of the same repository. Also, you can use a different branch in the same repository to store the static files generated from hugo, the last one is use the same repository to store the source code and the static files and deploy the static files to the Github Pages using a Workflow.
I decided to use the two repositories approach without git submodules implementation because it is easier to maintain, understand and has me the ability to keep the hugo repository (source code) private.
The Good 👍
- Hugo is very fast and “easy to use” (ones you understand its philosophy).
- Hugo allows me to write this blog posts in
Markdown. - Hugo has a lot of themes to choose from.
- GitHub Pages could be
freeand “easy to use”. - The blog is very fast and responsive.
- The blog implement fuzzy search using Fuse.js thanks to the Hugo Theme PaperMod implementation/integration.
- The blog is very easy to maintain and update.
The Bad 👎
- Migrating from
WordPresstoHugowas not easy. I made it manually and it took me some time, fortunately I didn’t have many posts. - At the beginning, I had some issues with the
Hugotheme I chose (PaperMod), but I was able to fix them after understanding howHugoworks. - I lost the
commentsand likes from theWordPressposts, I’m very sorry about that. - I take some time to have the right configuration of the
GitHub Pagesto use a public repository to host the blog (static files) and a private repository to host the source code of the blog (hugo files) and the magic to do that was the Github Actions Workflow I made.
Not so Bad / Not so Good 🫤
- I had to learn how to use
HugoandGitHub Pages, it takes some time, but it was worth it. - To have GitHub Pages for
free, I had to use a public repository -> slashdevops.github.io, but I am happy with it. This means you are seeing the code of this blog and how it is built (static files). Fortunately, I can have aprivate repositoryto host thesource codeof the blog (hugo implementation).
Relevant steps
This is not a detailed guide step by step, because I made this migration in a series of back and forth steps until this worked, but I want to share with you the most relevant steps I took to have this blog working properly.
The steps I’m sharing here are not necessary in the order I did them, and some of them are interdependent, but I will try to explain them in the order I think is more relevant.
NOTES:
- You should have installed and configured GitHub CLI to perform some of these steps.
- You should have installed and configured Hugo to perform some of these steps.
1. Repository Configuration
As I explained before, to have this blog working properly I needed two two repositories.
slashdevops.github.io:The repository to host thecompiled codeof the blog (static files coming from Hugo folder public).hugo-slashdevops.github.io:The repository to host thesource codeof the blog.
👉 I create these using the GitHub CLI, but you can create them using the GitHub web interface as well.
| |
So, for my migration I used the following repositories:
1.1 slashdevops.github.io repository
Repository slashdevops/slashdevops.github.io is public and it is used to host the compiled code of the blog (static files coming from Hugo folder public).
This should be filled by a GitHub Actions -> Workflow that will be in the repository hugo-slashdevops.github.io and used to build the blog and push the static files generated in the public folder to this repository.
This repository should not be empty to enable the GitHub Pages feature. So, I created a index.html file with a minimal content to avoid the repository being empty and to test the Github Pages configuration.
👉 The file I added to the repository slashdevops/slashdevops.github.io in the beginning was:
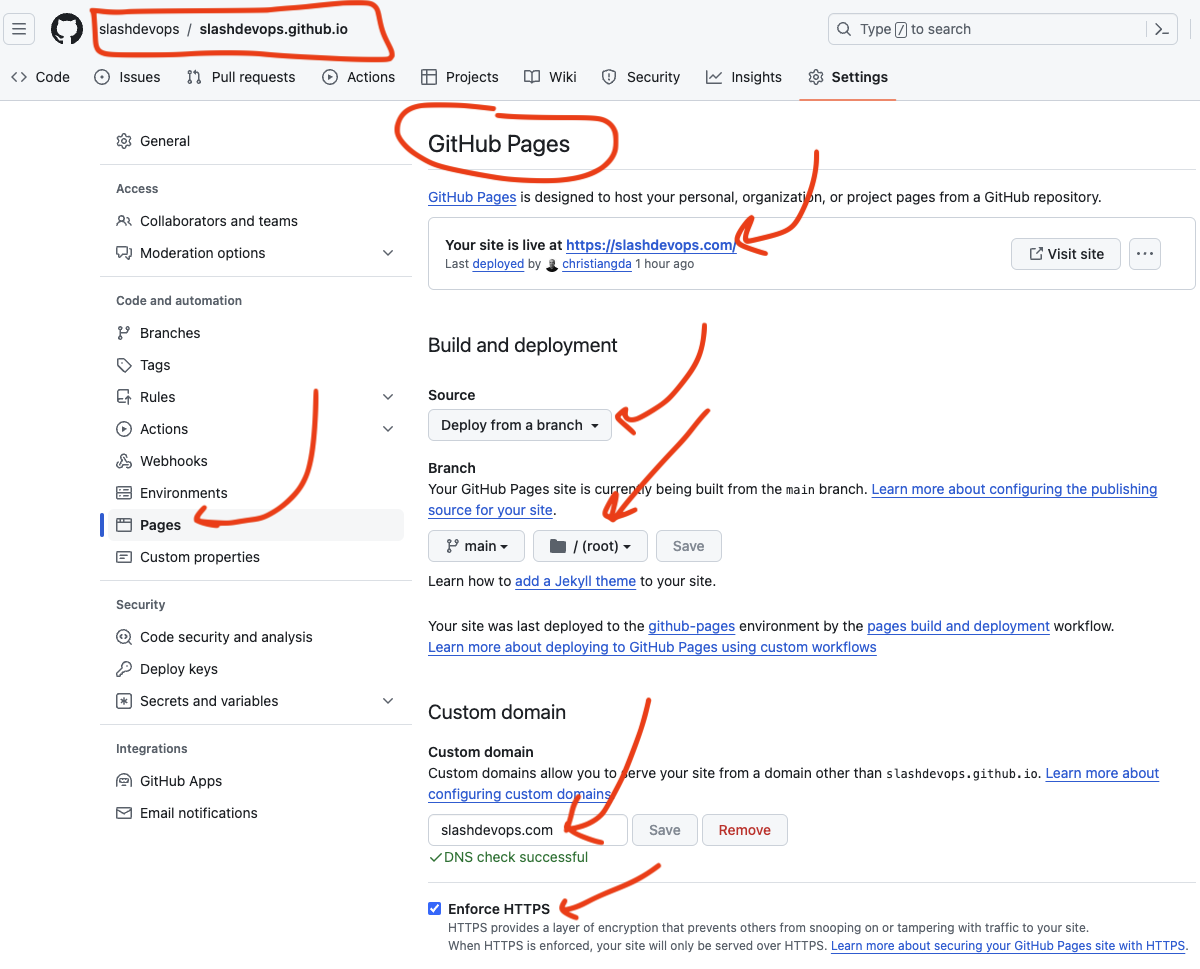
👉 And the configuration of this repository in the GitHub is:

👉 And after push the minimal html file to the repository, and configure your domain DNS as it is explained in the step 2 below, you can see the blog site working properly.

1.2 hugo-slashdevops.github.io repository
Repository slashdevops/hugo-slashdevops.github.io is private and it is used to host the source code of the blog. Basically, this repository contains the Hugo configuration, the Markdown files of the blog posts and the Github Action -> Workflow to build and deploy the static files into the repository slashdevops.github.io.
I used the .github/workflows/hugo.yaml configuration file recommended in Hugo - Host on GitHub Pages – and then I modified it to fit my needs, which is to have two repositories, one for the source code and another for the static files. –. This modification allows me to build the blog and deploy the static files to the repository slashdevops.github.io using git commands.
IMPORTANT: I needed to configure the Github Actions -> Workflow to use the GITHUB_TOKEN with the right permissions to allow the deployment of the static files to the repository slashdevops.github.io. I named it ACTIONS_GITHUB_TOKEN (see the line 81 of the code below).
👉 The content of the secret ACTIONS_GITHUB_TOKEN was created in the repository slashdevops/hugo-slashdevops.github.io in the Settings -> Secrets section of the repository and I used the GitHub CLI to create it.
👉 The code of the Github Action -> Workflow I used to build and deploy the blog is:
Source: slashdevops/hugo-slashdevops.github.io -> .github/workflows/hugo.yml private repository.
NOTES:
- This is a private repository, so you can’t see the code, but I will show you the code here.
- Highlighted lines are the most important lines in the code.
| |
2. Google Domains Configuration
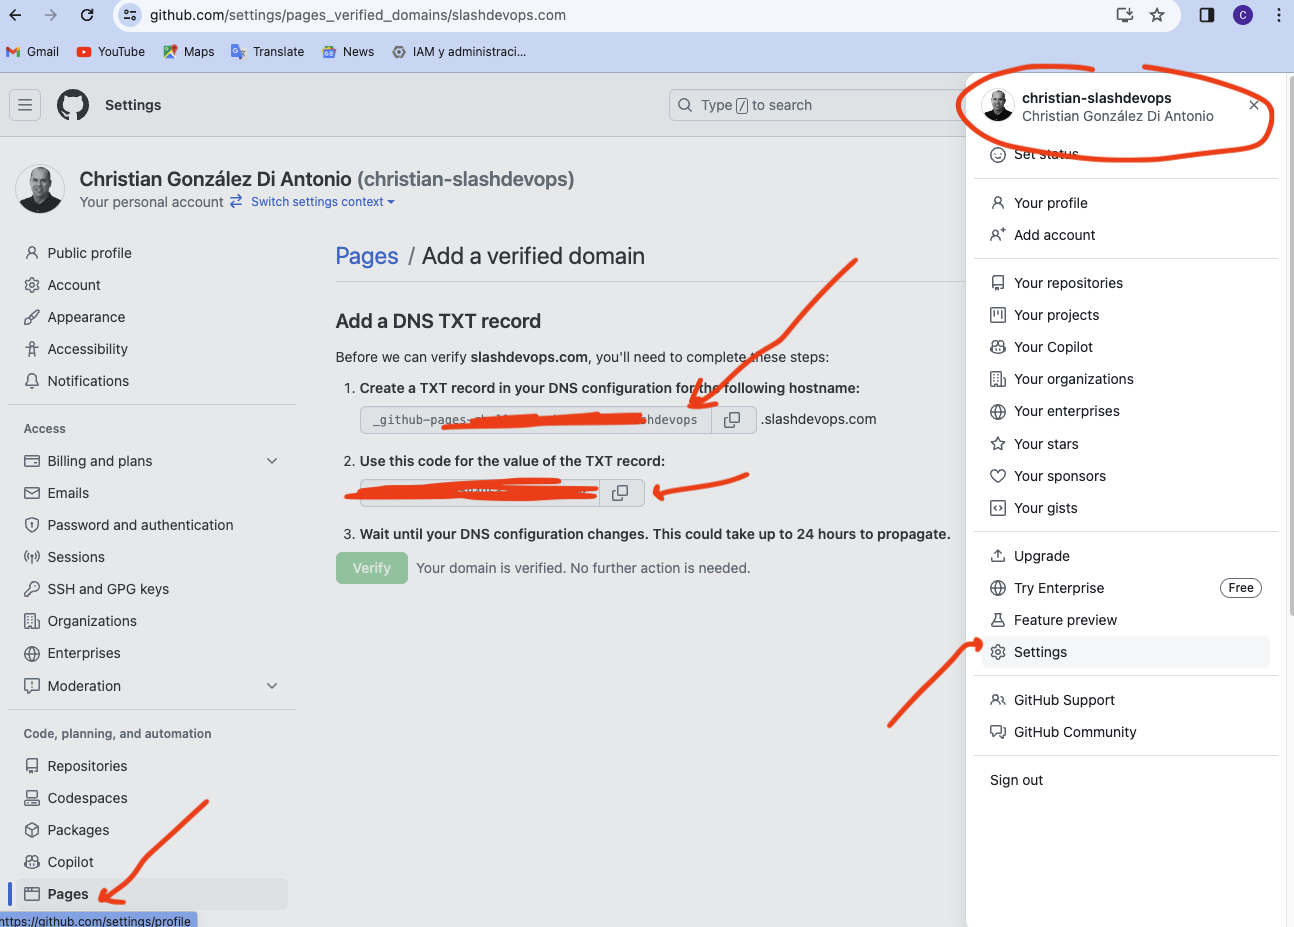
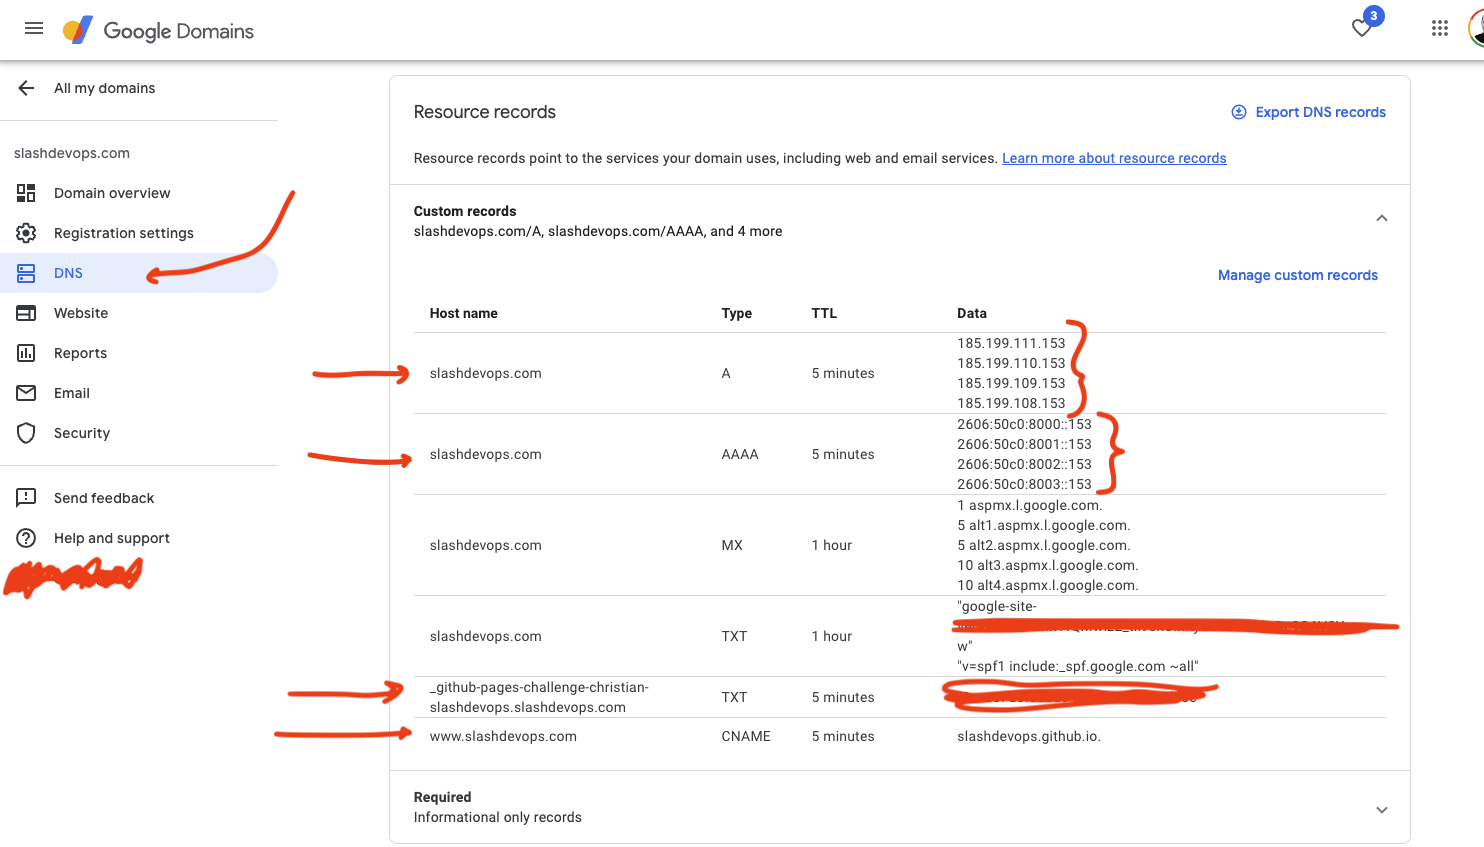
I made the validation of the domain slashdevops.com on my GitHub Settings account and then I configured the domain in Google Domains to point to the GitHub Pages servers (list of IPs in Configuring an apex domain).
NOTES:
- This step is not necessary if you are using the
GitHub Pagesdomain, but it is recommended for security reasons.
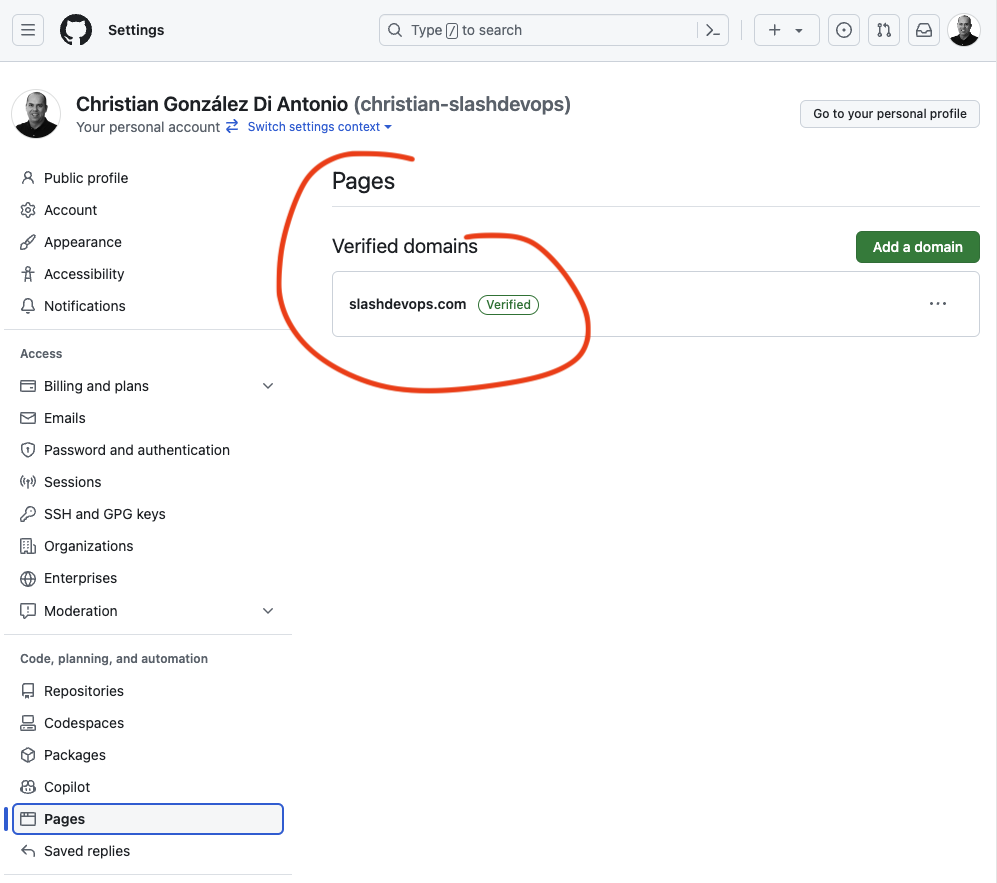
👉 This image shows how I configure the verified domains in GitHub Settings:

👉 After the Validation of the domain, I added the domain to the GitHub Pages configuration in the repository slashdevops.github.io settings.

Then, I configured the domain in Google Domains to point to the GitHub Pages servers. This configuration is done in the DNS section of the domain configuration in Google Domains.
👉 This image shows how I configured the domain in Google Domains:

References:
3. Hugo Configuration
Here there are some relevant configurations I made, let me enumerate them:
- The
hugo.tomlconfiguration file. - The
hugo static filescontent. You will need to put at least theCNAMEfile in thestaticfolder to configure the domain inGitHub Pages. - Enabling
messagesandlikeswith Disqus.
👉 1. My hugo configuration is very simple, I used the Hugo Theme -> PaperMod Wiki file as template and I made some changes to fit my needs.
My hugo.toml configuration files is:
| |
👉 2. My hugo static folder content:
The content of the CNAME file is:
source: slashdevops/hugo-slashdevops.github.io -> static/CNAME private repository.
| |
NOTES:
- Ensure the
CNAMEfile contains the domain you want to use and must be match with the hugo configurationbaseURLin thehugo.tomlfile and with the domain configuration inGoogle Domainsand with the domain configuration inGitHub Pages. - This file is located at the private repository
hugo-slashdevops.github.ioin thestaticfolder and will be deployed to the root of the public repositoryslashdevops.github.iowhen theGitHub Actions -> Workflowruns. - To understand why this is necessary read CNAME errors
👉 3. Enabling messages and likes with Disqus
To have messages and likes in the blog posts I used Disqus. To configure it, you need to create an account in Disqus and then create a new site in the Disqus configuration. After that, you will have a shortname that you will use in the hugo.toml configuration file.
To see the configuration in the hugo.toml file, see the hugo.toml configuration file above.
Then I override the themes/PaperMods//layouts/partials/comments.html creating a comments.html inside the layouts/partials folder of my hugo-slashdevops.github.io repository.
This is necessary because you need to have a comments.html with the configuration of the hugo -> Disqus I found in the Hugo -> Disqus -> source code the reference is here Hugo - Disqus.
source: slashdevops/hugo-slashdevops.github.io -> layouts/partials/comments.html private repository.
The content of the comments.html file is:
source: Hugo -> Disqus -> source code
| |
Conclusion
I am very happy with the migration from WordPress to Hugo and GitHub Pages. I can say that I am very satisfied with the result and I recommend this migration to anyone who wants to have a fast, responsive, and easy to maintain blog.